Two weeks with Lenovo ThinkPad P16s (AMD)

I’m a long-time fan of ThinkPad laptops. It’s not a fanatical love, but rather a moderate satisfaction combined with conservatism and an unwillingness to risk change. It’s just that with ThinkPads I kind of know what I’m going to get, I’m set on it, and I’m fine with it.

With ThinkPads, I started somewhere around the X201 and X230 when it was still a complementary machine to the main desktop, then went through the T420s, T440s to the flagship X1 Carbon (Gen4 and Gen6). I’ve always been looking for a machine for developer/office work (let’s say 50:50), and I care about solid performance, quiet operation, and I cared about light weight (daily commute with a bike backpack). On the other hand, I’m willing to pay 80K for a laptop, it’s my main work tool and I’m not really limited by budget (more expensive machines seem more like a splurge to me, rather than me wanting them and not being willing to pay that money for them).

Basically, keeping the basic criteria in mind (quality, weight, size, …) I always look for the best balance between performance and noise, and I have quite demanding criteria for noise and a pretty low upper limit. (Lately I’ve added the requirement for USB-C charging, I’m tired of carrying around adapters separately for different devices.)

Around a year ago, it came together again and I was looking for a replacement for my then X1 Carbon Gen6. Naturally, I was looking for the latest X1 Carbon at the time, however, after two X1s I had already experienced the relatively problematic cooling of the higher performance in these ultra-light machines and so René Stein’s positive recommendation of the ThinkPad T14/P14s with the promising AMD processor caught my eye.

Lenovo ThinkPad T14 AMD Gen2

I bought a T14 back then and after a year of daily use, I have to say that the ThinkPad T14 AMD Gen2 (specifically the 20XK002UCK) was a great choice. Intel slept a bit back then and the AMD Ryzen 7 PRO 5850U processor was a proper cut above comparable Intel models. With only 15W TDP (= extremely quiet operation, minimal throttling) it gets a lot done (super performance) and I really can’t praise the T14 enough. It may not be as subtle and exclusive as the X1 Carbon, but it’s still a great piece of hardware that carries very good performance for development. As a bonus, it was half the price of the X1 Carbon, so I wasn’t even afraid to take a chance on it at the time.

For the record, the T14 is essentially the same hardware as the P16s, differing in things like factory LCD calibration, ISV certification, etc.

Lenovo ThinkPad P16s AMD (Gen1)

And here’s today. After a year (I usually last two or three years with one machine), I’ve started itching for a change. I don’t really know why. I still consider my T14 to be a great machine, and I would be perfectly fine with it for another year/two. The only thing that bothers me is the 16:9 aspect ratio, seeing that today’s ThinkPads are 16:10, and then the size. For years I’ve mocked a colleague for lugging around a 15″ laptop, and it’s gotten to me, I can’t see it well and I’m tempted by the larger display.
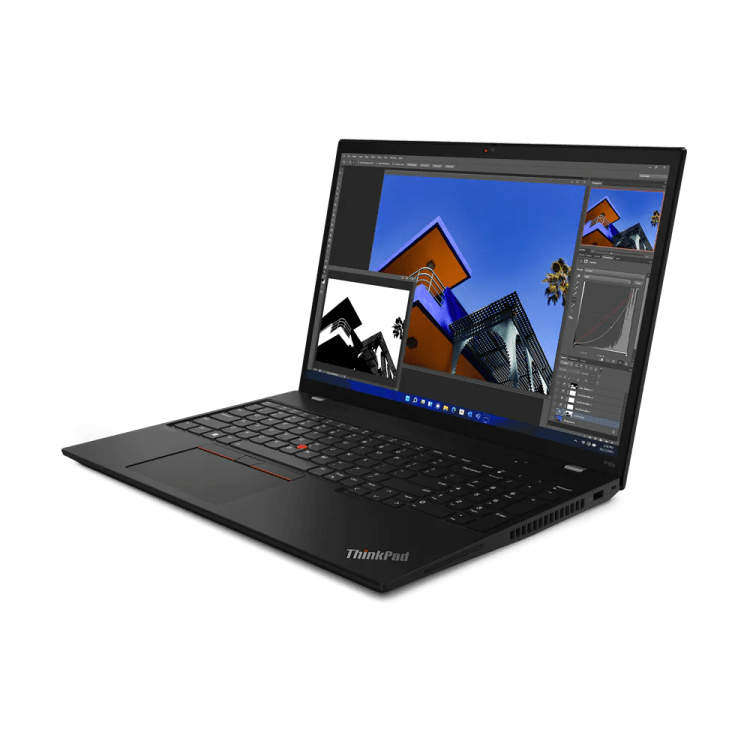
So it happened at the Update Conference that I hobbled over to Lenovo’s booth and walked away with an offer to borrow a ThinkPad P16s AMD Gen1. I’ve been eyeing their new ThinkPad Z16 before, but there I’m afraid of the all-new Z design (aluminum chassis ála MacBook or XPS, no ports), which I’d rather give a generation/two of time before it sits with Lenovo.

It took a while to get the loaner produced, but I ended up with a pre-production piece of ThinkPad P16s with the model name 21CLZA96US (WQXGA 2560×1600, AMD Ryzen 7 PRO 6850U, 32GB RAM, 2TB Performance SSD). Because I had arranged a two-week loan, I was able to install my work tools on the machine and used it in full production mode – a week of which was in classic mode (i.e. at work in a USB-C dock, at home standalone) and a week with the covid in full home-office (standalone).

First impressions (day 1)

On first hold, this is a denser machine than the T14. I was kind of hoping that as it’s more or less identical hardware in a different chassis, it would just be stretched to a format to accommodate a larger display and keyboard, but in fact it’s grown a bit in thickness as well, and right off the bat it struck me that a slightly more subtle design would suit it better.

The second thing that surprised me from the first moment was the keyboard. It’s the first ThinkPad I’ve ever tried that has a numeric keypad. I thought I’d just have to contend with the keyboard being offset to the left and would rather benefit from the added numeric section over time. But it turns out that the classic keyboard part is a bit smaller, and thus the good old days of the ultimate ThinkPad-chicklet keyboards are probably gone. The keyboard also has a smaller stroke.

On the other hand, the advantage of the 16″ display is clear from the start. Not only does more fit on the screen, but everything is bigger and beautiful to work with. For me, an expected and obvious plus from the first moment.

The machine came with Windows 10 pre-installed, which I practically immediately reinstalled to Windows 11. I managed to do a quick PassMark Benchmark, unfortunately I didn’t save it, but as far as I remember it came out a tad higher on Win10 classic than the subsequent Win11. The very first PassMark on Win11 came out 5900 points.

During the first day of playing with the laptop, it turned out that it was a bit orders of magnitude noisier than my existing T14. The cooling vent triggered almost every time I touched the mouse that day, and it was not a decent vent, but a distinct whirr. However, on the noise level of the machine, it should be noted at the outset that I was borrowing a pre-production piece, where this aspect is traditionally more problematic and production models tend to be more polished in this respect. In addition, thermal management is improving over time (with new firmware and driver versions). So personally I expect (hope?) that the resulting behavior will be noticeably better, certainly not worse.

Impressions after two weeks of production work

I ended up using the laptop for two weeks at full intensity as my only machine. I don’t know if I’ve rather gotten used to it, but I would definitely say subjectively that the thermal management has settled down a bit after a few days, the laptop is now willing to even slightly cool down during work, and it’s no longer just from extreme to extreme – nothing vs. blower. In office noise with a docking station, I’m basically not even aware of the cooling (except for the notorious MS Teams meeting issues, which are willing to eat up any amount of power and battery and could easily be used to fire up machines of any category), in a quiet home environment it echoes more than I would like, but acceptably so even for my high standards.

Anyway, the machine goes very willingly for performance (probably also due to the P-workstation tuning, compared to business T-models) and doesn’t hesitate to hold the CPU boost for longer periods of time, which necessarily implies the need for more intensive cooling. Additionally, the new AMD Ryzen 7 PRO 6850U has a TDP of 28W, so 30-38W normally flows into the CPU.

Summing up the overall impressions, the distinct pluses are:

  • Large 16″ quality display (at 2560×1600 resolution, it allows for good scaling),
  • a powerful AMD Ryzen 7 PRO 6850U processor with an acceptable TDP of 28W,
  • overall a performance-forgiving tuning (unless you need graphics performance),
  • ThinkPad quality chassis design,
  • USB-C power supply (even a small 65W adapter will suffice),
  • wide range of ports (USB-C, USB-A, HDMI, RJ-45, audio, …),
  • wide range of equipment (fingerprint reader, LTE module, smart-card reader,

Disadvantages include:

  • cooling could be quieter (I do not expect passive ala Mac, but for example ThinkPad T14 is two orders of magnitude better in this),
  • the design (size and weight) I would have liked to see more subtle, it’s quite small (compared to what I was used to),
  • the keyboard – I haven’t found the smaller format with the numeric part and smaller stroke yet.

Conclusion

Despite the described drawbacks, I consider the Lenovo ThinkPad P16s a very hilarious piece for anyone who needs a powerful laptop for development and desires a larger format. For comparison, I still have a promised loan of an Intel ThinkPad P1 Gen 5 (which is also made in a version without a dedicated graphics card). With its keyboard without the numeric part and at a slightly smaller size, it could be an interesting alternative. We’ll see how the intel processor (45W TDP) behaves in the performance vs thermal management relationship.

…Anyway, I’m ready to pick one of these laptops at the moment, I already promised my T14 to a colleague. :-D
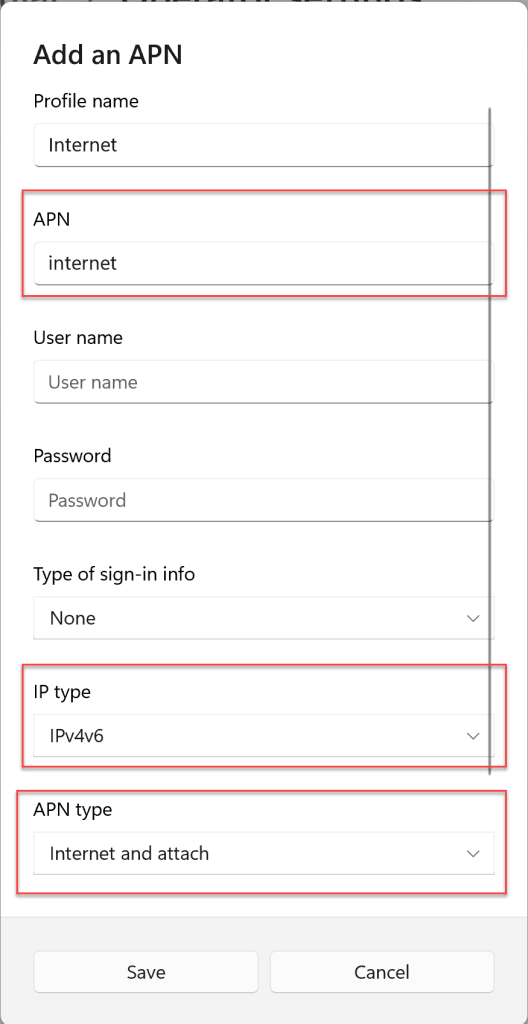
Lenovo WWAN – Quectel EM120R-GL – No service

Just spent several hours fixing the “No service” cellular issue in my Lenovo T14 AMD Gen 2 with Quectel EM120R-GL. The notebook was able to search for networks (when disabled the automatic network selection), but was not able to connect to internet (Vodafone CZ mobile provider).

It was more and more obvious that the issue is related to the APN profile.

In the end I found the right settings which connected the notebook to mobile internet almost immediately:

Announcing HAVIT Blazor 1.4.3 – Free Bootstrap 5 components for ASP.NET Blazor

Didn’t have a chance to announce our component bundle on this KnowledgeBase yet…

Now we released version 1.4.3. What’s new?

  • HxInputDateHxInputDateRange and HxCalendar have new MinDate and MaxDate parameters to allow customization of selectable dates in calendars (also added to Defaults to be able to customize the application-wide defaults)
  • HxInputDate and HxInputDateRange have new CalendarDateCustomizationProvider which allows further customization (enabled/disabled, CssClass) of individual dates in dropdown calendars
  • ⚠️ HxCalendar parameters MinYear and MaxYear replaced with the new MinDate and MaxDate parameters
  • HxCalendar has new simplified month/year navigation
  • HxInputDate fixed validation icon position if CalendarIcon is used
  • HxInputFileCore has new HxInputFileCore.Defaults.MaxFileSize application-wide default to be able to limit maximum file size,
  • HxInputFile has new HxInputFile.Defaults.InputSize application-wide default to be able to set form component size
  • HxSidebar fixed ability to scroll on mobile if viewport is overlapped
  • HxSidebar has new CSS variable for customising background-colour
  • Updated to Bootstrap 5.1.3 and Bootstrap Icons 1.6

What is HAVIT Blazor?

HAVIT Blazor is a free open-source (MIT) component bundle build on top of Bootstrap 5. It not only covers all Bootstrap 5 components but also brings a few enterprise-level ones (e.g. HxGrid, HxInputDate, HxAutosuggest, HxInputTags) and special ones (e.g. HxGoogleTagManager).

Interactive documentation & demos – https://havit.blazor.eu

Source code – https://github.com/havit/Havit.Blazor

Forms

Buttons & Indicators

Data & Grid

Layout & Typography

Navigation

Modals & Interactions

Special

Enterprise-application template [OPTIONAL]

Beside the components there is a ready to run enterprise level application template which includes gRPC code-first communication, full layered architecture stack (Model, DataLayer, Services, …) and much more.

Grpc.Core.RpcException: Status (StatusCode=”Unimplemented”, Detail=”Bad gRPC response. HTTP status code: 404″)

If this is the Havit.Blazor stack, make sure you are starting the Web.Server project (ASP.NET Host), not the Web.Client (Blazor WASM SPA).

Blazor WASM not loading CSS files (or other static assets) from Razor Component libraries

Make sure you reference the razor library from the ASP.NET Host (Web.Server), otherwise the ASP.NET Host does not have any knowledge of your library unless you reference it directly.

Blazor WASM error: Could not load settings from ‘_configuration/BlazorClient’

Make sure your startup project is set to Web.Server (ASP.NET Host).

This kind of error appears when you try to start the Web.Client directly.

blazor.webassembly.js:1 crit: Microsoft.AspNetCore.Components.WebAssembly.Rendering.WebAssemblyRenderer[100]
      Unhandled exception rendering component: Could not load settings from '_configuration/Havit.Bety2.Web.Client'
      Error: Could not load settings from '_configuration/Havit.Bety2.Web.Client'
          at Function.createUserManager (http://localhost:59799/_content/Microsoft.AspNetCore.Components.WebAssembly.Authentication/AuthenticationService.js:1:5893)
          at async Function.initializeCore (http://localhost:59799/_content/Microsoft.AspNetCore.Components.WebAssembly.Authentication/AuthenticationService.js:1:5027)
Microsoft.JSInterop.JSException: Could not load settings from '_configuration/Havit.Bety2.Web.Client'
Error: Could not load settings from '_configuration/Havit.Bety2.Web.Client'

HxInputFile – Blazor InputFile extension with direct (native) upload and progress indication

Starting with .NET 5 there is a InputFile component in Blazor which allows you to access content of the corresponding file(s) in form of a Stream (IBrowserFile.OpenReadStream).

If you run Blazor on server, the InputFile implementation sends the file content from browser to server through a SignalR connection almost at native speed (approx. 30% slower). In case of Blazor WebAssembly, you have to transfer the file to server on your own.

Due to unmarshalled interop Blazor is able to copy the file to WASM memory extremely quickly (approx. 100MB/sec). You can process the file on client-side (resize image etc.), but if you just want to upload the file, the cost of WASM is relatively high (in comparison to direct HTTP upload) and not suitable for larger files:

Direct (native) upload

To get over the limits of InputFile component in WASM, we can upload the files to server directly from JavaScript using XMLHttpRequest:

var data = new FormData();
data.append('file', file, file.name);

var request = new XMLHttpRequest();
request.open('POST', uploadEndpointUrl, true);
request.send(data);

(Unlike XMLHttpRequest the new fetch() API does not support progress indication.)

Progress indicator

XMLHttpRequest gives you nice progress indication by using the onprogress event:

request.upload.onprogress = function (e) {
    // e.loaded - bytes already uploaded
    // e.total - total upload size (slightly bigger than the file size)
};

HxInputFile / HxInputFileCore

Let’s put this all together and create a new component. We will call it HxInputFileCore (+ the HxInputFile which is a ready-made Bootstrap derivative).

The most important portions follow:

public partial class HxInputFileCore : InputFile, IAsyncDisposable
{
	[Parameter] public string UploadUrl { get; set; }
	[Parameter] public EventCallback<UploadProgressEventArgs> OnProgress { get; set; }
	[Parameter] public EventCallback<FileUploadedEventArgs> OnFileUploaded { get; set; }
	[Parameter] public EventCallback<UploadCompletedEventArgs> OnUploadCompleted { get; set; }
	[Parameter] public bool Multiple { get; set; }
	[Parameter] public string Id { get; set; } = "hx" + Guid.NewGuid().ToString("N");

	[Inject] protected IJSRuntime JSRuntime { get; set; }

	private DotNetObjectReference<HxInputFileCore> dotnetObjectReference;
	private IJSObjectReference jsModule;

	public HxInputFileCore()
	{
		dotnetObjectReference = DotNetObjectReference.Create(this);
	}

	protected override void OnParametersSet()
	{
		base.OnParametersSet();

		// TODO Temporary hack as base implementation of InputFile does not expose ElementReference (vNext: https://github.com/dotnet/aspnetcore/blob/main/src/Components/Web/src/Forms/InputFile.cs)
		AdditionalAttributes ??= new Dictionary<string, object>();
		AdditionalAttributes["id"] = this.Id;
		AdditionalAttributes["multiple"] = this.Multiple;
	}

	public async Task StartUploadAsync(string accessToken = null)
	{
		jsModule ??= await JSRuntime.InvokeAsync<IJSObjectReference>("import", "./_content/Havit.Blazor.Components.Web/hxinputfilecore.js");
		await jsModule.InvokeVoidAsync("upload", Id, dotnetObjectReference, this.UploadUrl, accessToken);
	}

	[JSInvokable("HxInputFileCore_HandleUploadProgress")]
	public async Task HandleUploadProgress(int fileIndex, string fileName, long loaded, long total)
	{
		var uploadProgress = new UploadProgressEventArgs() { /*...*/	};
		await OnProgress.InvokeAsync(uploadProgress);
	}

	[JSInvokable("HxInputFileCore_HandleFileUploaded")]
	public async Task HandleFileUploaded(int fileIndex, string fileName, long fileSize, string fileType, long fileLastModified, int responseStatus, string responseText)
	{
		var fileUploaded = new FileUploadedEventArgs() { /* ... */ };
		await OnFileUploaded.InvokeAsync(fileUploaded);
	}

	[JSInvokable("HxInputFileCore_HandleUploadCompleted")]
	public async Task HandleUploadCompleted(int fileCount, long totalSize)
	{
		var uploadCompleted = new UploadCompletedEventArgs() { /* ... */
		};
		await OnUploadCompleted.InvokeAsync(uploadCompleted);
	}

	public async ValueTask DisposeAsync()
	{
		// ...
	}
}

…and the supportive JavaScript is:

export function upload(inputElementId, hxInputFileDotnetObjectReference, uploadEndpointUrl, accessToken) {
	var inputElement = document.getElementById(inputElementId);
	var dotnetReference = hxInputFileDotnetObjectReference;
	var files = inputElement.files;
	var totalSize = 0;
	var uploadedCounter = 0;

	for (var i = 0; i < files.length; i++) {
		(function (curr) {
			var index = curr;
			var file = files[curr];
			totalSize = totalSize + file.size;

			var data = new FormData();
			data.append('file', file, file.name);

			var request = new XMLHttpRequest();
			request.open('POST', uploadEndpointUrl, true);

			if (accessToken) {
				request.setRequestHeader('Authorization', 'Bearer ' + accessToken);
			}

			request.upload.onprogress = function (e) {
				dotnetReference.invokeMethodAsync('HxInputFileCore_HandleUploadProgress', index, file.name, e.loaded, e.total);
			};
			request.onreadystatechange = function () {
				if (request.readyState === 4) {
					dotnetReference.invokeMethodAsync('HxInputFileCore_HandleFileUploaded', index, file.name, file.size, file.type, file.lastModified, request.status, request.responseText);
				};

				uploadedCounter++;
				if (uploadedCounter === files.length) {
					dotnetReference.invokeMethodAsync('HxInputFileCore_HandleUploadCompleted', files.length, totalSize);
				}
			}

			request.send(data);
		}(i));
	}
}

The component is part of open-sourced library HAVIT Blazor published on GitHub.

Usage

<HxInputFile @ref="hxInputFileComponent" Label="HxInputFile" UploadUrl="/file-upload-streamed/" OnProgress="HandleProgress" OnFileUploaded="HandleFileUploaded" OnUploadCompleted="HandleUploadCompleted" Multiple="true" />

<HxButton Text="Upload" OnClick="HandleUploadClick" />

@code
{
	private HxInputFile hxInputFileComponent;

	private async Task HandleUploadClick()
	{
		files.Clear();

		string accessToken = null;
		
		var accessTokenResult = await ... // use IAccessTokenProvider
		await hxInputFileComponent.StartUploadAsync(accessToken);
	}

	private Task HandleProgress(UploadProgressEventArgs progress)
	{
		// indicate progress here
	}

	private Task HandleFileUploaded(FileUploadedEventArgs fileUploaded)
	{
		// individual file uploaded
	}

	private Task HandleUploadCompleted(UploadCompletedEventArgs uploadCompleted)
	{
		// all files uploaded
	}
}

TODOs

The presented component if not feature complete. There is some more work to do:

  • Maximum file size limit
  • Limit number of files being uploaded in parallel
  • Better error-handling
  • …?

Links

See also

SQL LocalDB: Upgrade to 2019 (15.0.2000)

For me it was quite confusing to find the 2019 version of LocalDB and it is not a streamline process to upgrade your local default instance.

The easiest way to upgrade your LocalDB instance to 2019 is:

  1. Download the LocalDB 2019 installer by using the SQL Server Express installer.
    https://go.microsoft.com/fwlink/?linkid=866658
    1. Run the installer and select “Download Media”.
    2. Select “LocalDB” + click Download.
  2. Before running the SqlLocalDB.msi installer, delete your current MSSQLLocalDB instance:
sqllocaldb stop MSSQLLocalDB
sqllocaldb delete MSSQLLocalDB
  1. Run the new SqlLocalDB.msi (2019) installer. It will create a new MSSQLLocalDB instance.
  2. RESTART YOUR PC! (Otherwise MS SQL Management Studio will still tell you you have an old version running, etc. etc.)
  3. Now you can re-attach your original databases one by one using SQL Server Management Studio (RClick + Attach…)
  4. Done.

Office365 Teams: PowerShell automation of team membership

Office365 Academic (Education) does not support organization-wide teams. To get over this limitation, you can maintain the membership by a simple PowerShell script:

Get-MsolUser -All | Where-Object { $_.Licenses.ServiceStatus.ServicePlan.ServiceName -match "TEAMS"} | ForEach-Object { [pscustomobject]@{User = $PSItem.UserPrincipalName} } | Add-TeamUser -GroupId f29dbfc0-d118-4480-a6f7-22048a0809d0 -Role Member

In short:

  1. Take all Azure Active Directory users.
  2. Filter them to those having a Teams license assigned.
  3. Transform the data to input usable for Add-TeamUser cmdlet.
  4. Add the users to the team (you will get the GroupId by using Get-Team cmdlet)

You can run the script repeatedly, just the missing users will be added. You can modify the script easily and apply any additional conditions when adding the users to the group.

Might help:

Install-Module MicrosoftTeams
Install-Module MSOnline

Connect-MicrosoftTeams
Connect-MsolService

Get-Team

Blazor WebAssembly with gRPC-Web code-first approach

Do you like WCF-like approach and need to cover communication in between ASP.NET Core service and Blazor WebAssembly client? Use code-first with gRPC-Web! You can try the it right now by following a few simple steps (GitHub repo):

1. Blazor.Server – Prepare the ASP.NET Core host

Add NuGet packages:

  1. Grpc.AspNetCore.Web (prerelease)
  2. protobuf-net.Grpc.AspNetCore

Register CodeFirstGrpc() and GrpcWeb() services in Startup.cs ConfigureServices() method:

services.AddCodeFirstGrpc(config => { config.ResponseCompressionLevel = System.IO.Compression.CompressionLevel.Optimal; });

Add GrpcWeb middleware in between UseRouting() and UseEndpoints():

app.UseGrpcWeb(new GrpcWebOptions() { DefaultEnabled = true });

2. Blazor.Shared – Define the service contract (code-first)

Add System.ServiceModel.Primitives NuGet package.

Define the interface of your service:

[ServiceContract]
public interface IMyService
{
	Task DoSomething(MyServiceRequest request);

}

[DataContract]
public class MyServiceResult
{
	[DataMember(Order = 1)]
	public string NewText { get; set; }

	[DataMember(Order = 2)]
	public int NewValue { get; set; }
}

[DataContract]
public class MyServiceRequest
{
	[DataMember(Order = 1)]
	public string Text { get; set; }

	[DataMember(Order = 2)]
	public int Value { get; set; }
}

3. Blazor.Server – Implement and publish the service

Implement your service:

public class MyService : IMyService
{
	public Task DoSomething(MyServiceRequest request)
	{
		return Task.FromResult(new MyServiceResult()
		{
			NewText = request.Text + " from server",
			NewValue = request.Value + 1
		});
	}
}

Publish the service in Startup.cs:

app.UseEndpoints(endpoints =>
{
	endpoints.MapGrpcService();
	// ...
}

4. Blazor.Client (Blazor Web Assembly) – consume the service

Add NuGet packages:

  1. Grpc.Net.Client
  2. Grpc.Net.Client.Web (prerelease)
  3. protobuf-net.Grpc

Consume the service in your razor file:

var handler = new Grpc.Net.Client.Web.GrpcWebHandler(Grpc.Net.Client.Web.GrpcWebMode.GrpcWeb, new HttpClientHandler());
using (var channel = Grpc.Net.Client.GrpcChannel.ForAddress("https://localhost:44383/", new Grpc.Net.Client.GrpcChannelOptions() { HttpClient = new HttpClient(handler) }))
{
	var testFacade = channel.CreateGrpcService();
	this.result = await testFacade.DoSomething(request);
}

(You can move the plumbing to ConfigureServices() and use pure dependency injection in your razor files.)

References

  1. Steve Sanderson: Using gRPC-Web with Blazor WebAssembly
  2. Use gRPC in browser apps | Microsoft Docs
  3. protobuf-net.Grpc – Getting Started