HAVIT, s.r.o., a Prague-based digital studio for the AI era focused on custom software development, AI implementation and adoption, and Microsoft Azure, today announced that it has been named an OpenAI Select Partner within the OpenAI Partner Network.
The OpenAI Partner Network is a global program for partners to build, sell, and deliver AI solutions with OpenAI. It brings together partners with deep industry expertise, delivery capabilities, and customer relationships while equipping them with resources, enablement, and support to help enterprises adopt OpenAI frontier models and products and turn them into measurable impact.
As an OpenAI Select Partner, HAVIT will continue working with OpenAI to help organizations build, deploy, and scale AI solutions responsibly and effectively. This work will help organizations get more useful work from every token and stronger performance per dollar with GPT‑6 Astra, while using ChatGPT Work to turn ambitious goals into finished work. Since 1997, HAVIT has delivered more than 200 projects across fintech, automotive, healthcare, and other industries, combining strategy, design, engineering, and AI agents under one roof.
“Being named an OpenAI Select Partner confirms the direction we have been taking for the past years — bringing AI from experiments into production systems our customers rely on every day. We plan to work closely with OpenAI to embed frontier models into the applications we build and operate, so our customers get measurable outcomes: faster processes, lower operating costs, and software that genuinely works for its users,” said Robert Haken, Founder & Software and Cloud Architect, HAVIT.
HAVIT supports organizations across industries with AI implementation and adoption (from demo to production), AI onboarding of developer teams, digital product development with complete product teams, and Microsoft Azure expertise — from architecture to operations as a Microsoft Cloud Solution Provider. Its work includes AI agents and AI capabilities deployed directly into customers’ production systems, as well as mentoring development teams through the transition to AI-assisted development.
Looking ahead, HAVIT plans to expand its OpenAI-related offerings, invest in team enablement, and scale AI deployments within customer solutions, helping customers translate AI ambition into business outcomes.
Broker Trust, a.s. deployed Claude Team with HAVIT. After targeted training, a new way of working took hold: instead of writing a specification and waiting, a product owner builds the simpler changes himself in Claude Code and submits them as pull requests. Before the deployment, a comparable change typically took 3–4 weeks from idea to production; the fastest of these pull requests was merged to production 16 hours after it was submitted.
The challenge
BETY2 is the CRM used by Broker Trust’s network of financial advisors. The product side knew exactly what needed improving — but every change, however small, went through the same pipeline: write a specification, hand it to development, wait for capacity, clarify it over meetings. And because a written specification is only ever an approximation of what someone had in mind, clarification came with every request. For a simple change, the path from idea to production typically took 3–4 weeks — most of it spent waiting, not working.
The solution
Broker Trust deployed Claude Team across its organization — 42 seats, including 10 Premium seats with Claude Code — and administers its own tenant and licensing. The deployment grew from 10 seats to 42 within three weeks of go-live.
But the change that mattered was not the seat count. It was hands-on training for the people closest to the product. HAVIT, s.r.o., Broker Trust’s long-standing application development supplier, onboarded and trained selected users in lectures and workshops focused on one specific skill: using Claude Code to turn an idea into working code against their own codebase. The sessions ran in June and July 2026.
Two product owners went through the training. The first of them is already contributing to the codebase: Martin Budín, product owner of BETY2. He now works a different way — instead of writing a specification and waiting for a developer, he describes the change to Claude Code, iterates on it against the real codebase, and submits the result as a pull request. HAVIT’s developers review and merge it. He has submitted four pull requests this way; three of them have been merged and deployed to production.
The important part is what this does to the design step. When a product owner explores a change directly in the code, the proposal that reaches the development team isn’t a static mockup or a paragraph of prose — it’s a working implementation you can click through and argue with. Ambiguity that used to surface late, during development, now surfaces at the start.
The same shift reached design work. Broker Trust’s product team now prepares application design proposals with Claude itself, instead of scheduling the work with a designer — so the design step no longer waits on anyone’s calendar.
Nothing about code review changed to make this possible. Every change still goes through review by HAVIT’s developers before it reaches production; product owners open pull requests, they don’t merge them. What changed is who can produce a credible starting point — and how fast.
The measured results
The fastest change went from pull request to production in 16 hours — down from a typical 3–4 weeks before the deployment, a reduction of over 95 % in cycle time. Before the deployment, a small BETY2 change waited for a specification, a hand-over, and free development capacity — typically 3–4 weeks end to end. Now the product owner submits a working implementation, and the only remaining step is code review: the fastest of his pull requests was reviewed, merged, and deployed to production within 16 hours of being submitted.
A working implementation now exists on day one instead of week three. The product owner builds each change with Claude Code and submits it as a working, clickable pull request the same day he takes it up — where previously nothing reviewable existed until a developer picked the specification up, typically weeks later. Developer time per change fell accordingly: from hours of implementation against a written specification to the review of a working pull request.
Design preparation dropped from 4 weeks to 1 week. Application design proposals that the product team previously prepared with a designer over a typical 4 weeks are now prepared by the product team itself with Claude in 1 week — and what reaches development is a clickable proposal.
In numbers, in the first two months of production use:
4 pull requests authored by a Broker Trust product owner; 3 reviewed, merged, and deployed to production
Fastest pull request from submission to production: 16 hours — versus a typical 3–4 weeks per change before the deployment
Design preparation for application changes: from 4 weeks with a designer to 1 week by the product team itself
2 product owners trained to work with Claude Code against their own application
Claude adoption grew 4× — from 10 to 42 seats — within three weeks of go-live
“We used to have to describe every change, however small, hand it over and wait for capacity to free up. Today, for the simpler ones, our product owner builds it himself and submits it as a pull request for review. What helped us most is that we’re no longer discussing the wording of a specification, but a finished thing we can click through.”
— Petr Musil, Technical architect, Broker Trust
What’s next
The experience carries forward. Broker Trust is preparing its own agentic tooling on Claude to connect its internal systems — and is building much of it in-house.
If you have a .NET preview SDK installed on your machine (for example, the .NET 11 preview), the dotnet CLI may default to it — and in my case (apparently due to a bug in the preview), this caused builds and tests to run significantly slower than with the release SDK. It also shows up with AI coding agents that invoke dotnet from the command line.
The fix is to add a global.json to the solution root that opts out of preview SDKs:
{
"sdk": {
"version": "10.0.0",
"allowPrerelease": false,
"rollForward": "latestFeature"
},
"test": {
"runner": "Microsoft.Testing.Platform"
}
}
The key bit is allowPrerelease: false — dotnet will skip the preview SDK and pick the release one. Adjust version to match your target .NET version.
We ran into an interesting issue after installing .NET 9 SDK 9.0.204 (and 9.0.300 didn’t help either) with published Blazor WebAssembly front-ends. The app failed to load, and the browser console output showed this error:
ManagedError: AggregateException_ctor_DefaultMessage (Could not resolve type with token 01000024 from typeref (expected class 'System.Reflection.Assembly' in assembly 'netstandard, Version=2.1.0.0, Culture=neutral, PublicKeyToken=cc7b13ffcd2ddd51'))
    at an (dotnet.runtime.5nhp1wfg9b.js:3:26894)
    at Kt.resolve_or_reject (dotnet.runtime.5nhp1wfg9b.js:3:26449)
    at dotnet.runtime.5nhp1wfg9b.js:3:172714
    at dotnet.runtime.5nhp1wfg9b.js:3:172778
    at fr (dotnet.runtime.5nhp1wfg9b.js:3:35046)
    at Fc (dotnet.runtime.5nhp1wfg9b.js:3:172361)
    at dotnet.native.swgexbmoy7.wasm:0x1f1a4
    at dotnet.native.swgexbmoy7.wasm:0x1c8ae
    at dotnet.native.swgexbmoy7.wasm:0xea19
    at dotnet.native.swgexbmoy7.wasm:0x1ec88
Our first suspicion was trimming, but to make a long story short, this turned out to be the classic issue that comes with builds after installing a new SDK: you need to clear the build agents’ working folders if your builds don’t run in completely clean environments and rely on any kind of incremental setup.
Translated to local development in Visual Studio: make sure to clean the solution and manually delete the bin and obj folders.
Why am I posting this? In case someone else runs into the same error, maybe they’ll find this post and save time troubleshooting. We’ve pretty much gotten used to builds breaking after a new SDK install, and our go-to move is wiping the build agent workspace before diving deeper.
But this was a first for us: the build actually succeeded, but the output was “broken” in a way that only surfaced when running the Blazor WASM frontend in the browser.
Beware of using await periodicTimer.WaitForNextTickAsync(). This method is appealing due to its asynchronous signature, making it easy to set up periodic tasks, which might tempt you to implement UI updates with it, especially in Blazor:
protected override async Task OnInitializedAsync()
{
    await StartTimerAsync();
}

private async Task StartTimerAsync()
{
    using var timer = new PeriodicTimer(TimeSpan.FromSeconds(10));
    while (await timer.WaitForNextTickAsync())
    {
        // do some UI updates here
    }
}
Warning! While this approach doesn’t block the UI thread thanks to async-await, the issue is that the method calling such code never actually completes.
For instance, if StartTimerAsync() is called directly from OnInitializedAsync, OnParametersSetAsync, OnAfterRenderAsync, or an action callback, the parent method will never finish, leading to some unexpected consequences, like:
The button also stays under single-click protection, disabled, and unusable.
If called from OnInitializedAsync, the first roundtrip won’t invoke OnParametersSet[Async], which won’t execute until a new roundtrip arrives.
Calling from OnParametersSetAsync leaves an unfinished task in ComponentBase.CallStateHasChangedOnAsyncCompletion() and requires handling to prevent multiple timers from starting, as OnParametersSetAsync is called repeatedly.
If called from OnAfterRenderAsync(bool firstRender), it could block the await base.OnAfterRenderAsync(firstRender) call, disrupting inherited functionality (especially crucial for firstRender = true, which only runs once).
So, PeriodicTimer.WaitForNextTickAsync() is more appropriate in scenarios where it’s safe for the calling code to continue indefinitely, such as in a Main method for a console application handling cyclical tasks or within BackgroundService.ExecuteAsync(). In general, however, the calling method should be allowed to complete. Instead, a traditional setup using Task.Run(..) is recommended, placing the timer (or even a regular Timer) on the ThreadPool without awaiting its completion in the current method (fire-and-forget). In Blazor, this requires manually invoking StateHasChanged() or possibly DispatchExceptionAsync().
Example:
public MyComponent : IDisposable
{
    private PeriodicTimer timer;

    protected override async Task OnInitializedAsync()
    {
        _ = Task.Run(StartTimerAsync);
    }

    private async Task StartTimerAsync()
    {
        timer = new PeriodicTimer(TimeSpan.FromSeconds(10));
        while (await timer.WaitForNextTickAsync())
        {
            // do some UI updates here
            StateHasChanged(); // as needed
        }
    }

    public void Dispose()
    {
        timer?.Dispose();
    }
}
Don’t forget cleanup with timer.Dispose(), or the Timer will keep running even after the component is destroyed, leading to resource leaks.
I’ve been struggling for a long time with how to quickly navigate to a member in a larger file when I already know its name.
Resharper/Rider has a direct Go to file member shortcut with Alt + \.
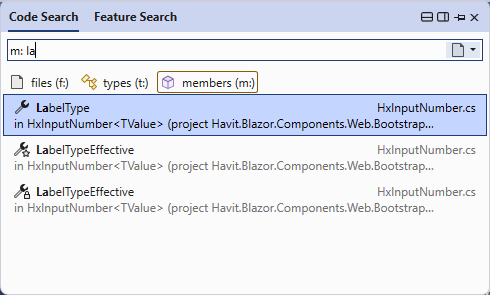
Visual Studio 2022 has a Go to member feature, but by default, it’s scoped to the entire solution.
It’s one of those classic Go to… tools with the m: prefix that searches for members but across the whole solution. Worse, it doesn’t prioritize results from the current file 😭. There’s no shortcut or a clear way to pre-scope it to the current file.
HOWEVER!!! There’s one feature I just discovered today that makes it usable (at least for me) – it remembers the last scope, and it does so separately for different use cases. Plus, it shares the same shortcut Alt + \.
So:
You open it once through Go to member (Alt+\), change the scope to Current file, and from then on, it will remember that setting.
This doesn’t affect other use cases. For Go to all (Ctrl + T) or Go to file (Ctrl + Shift + T), it still remembers the Current solution scope for me.
gRPC is a phenomenon of our time. This modern and performance-efficient protocol is rapidly spreading, and today we will show how to use it for communication between the Blazor WebAssembly front-end and the ASP.NET Core backend (host):
We will efficiently use the possibilities of sharing code between the server and client part. We will use the code-first arrangement and put the “contract” (interface for the called service and data object definitions) into the assembly shared by both the server and client parts of the solution.
To overcome browser limitations, we will use the gRPC-Web extension.
We will show the entire implementation on a simple example – we will use the default Blazor WebAssembly App template from Visual Studio (ASP.NET Core hosted, version of the .NET7 template) and we will convert the prepared Fetch data example, which uses the REST API in this template, to a gRPC-Web call using code-first.
Let’s do this, it’s just a few steps:
1. MyBlazorSolution.Server – Preparing ASP.NET Core host
First, we prepare the server-side infrastructure for gRPC. We will go directly to the version with the gRPC-Web extension with code-first support and install NuGet packages
2. MyBlazorSolution.Shared – Service contract definition (code-first)
Now we define in the form of an interface what our service will look like. We will then use the interface on the server side (we will create its implementation) and on the client side (we will generate a gRPC client that will implement the interface and we will directly use it in our code via dependency injection). Add to the project a NuGet package that allows us to decorate the interface with necessary attributes
Find the example WeatherForecast.cs file from the project template. It contains the definition of the return data message, which the sample REST API now returns to us. We will convert this class into the following form:
[DataContract]
public class WeatherForecast
{
    [DataMember(Order = 1)]
    public DateTime Date { get; set; }

    [DataMember(Order = 2)]
    public int TemperatureC { get; set; }

    [DataMember(Order = 3)]
    public string? Summary { get; set; }

    public int TemperatureF => 32 + (int)(TemperatureC / 0.5556);
}
We added the [DataContract] attribute to mark the class we will use as the gRPC data message.
We added [DataMember(Order = ...)] attributes that mark the elements to be transmitted via gRPC (others are ignored, here TemperatureF is calculated and recalculated from other data on the client anytime). Each element needs to be set Order, which defines the fixed layout for the used protobuf serialization.
We replaced the original DateOnly type with DateTime. We have to stick to types supported by used protobuf serialization.
Next, we need to create an interface that will describe the whole service:
The [ServiceContract] attribute tells us the applicability for gRPC (can be used later for automatic registrations).
By the nature of network communication, the entire interface should be asynchronous.
We can use the optional CancellationToken, which can convey a signal of premature termination of communication by the client (or disconnection).
3. MyBlazorSolution.Server – Implementing the gRPC service
Now we need to implement the prepared interface on the server side (we will use slightly modified code from the sample WeatherForecastController, which you can now delete):
Now we have to add the gRPC service in Startup.cs:
app.MapGrpcService<WeatherForecastFacade>();
4. MyBlazorSolution.Client – gRPC client in Blazor WebAssembly
Now all that is left is to use the service in the Blazor WebAssembly front-end. The entire definition is available in the form of the IWeatherForecastFacade interface with its WeatherForecast data class.
We will add the necessary NuGet packages to the project:
Register the gRPC-Web infrastructure and the client (in factory form) in Program.cs:
builder.Services.AddTransient<GrpcWebHandler>(provider => new GrpcWebHandler(GrpcWebMode.GrpcWeb, new HttpClientHandler()));

builder.Services.AddCodeFirstGrpcClient<IWeatherForecastFacade>((provider, options) => =>
    {
        var navigationManager = provider.GetRequiredService<NavigationManager>();
        var backendUrl = navigationManager.BaseUri;

        options.Address = new Uri(backendUrl);
    })
    .ConfigurePrimaryHttpMessageHandler<GrpcWebHandler>();
Well, now we can use IWeatherForecastFacade anywhere in the front-end project by having the service injected using dependency injection. So, for example, we’ll modify FetchData.razor to use our new gRPC service instead of the original REST API:
The gRPC service can, of course, accept input. In this case, use one input parameter for the incoming message – a data class created in the same way we prepared the WeatherForecast output. (Usually these classes are referred to as Data Transfer Object and thus given the suffix Dto. The implementation is usually as a C# record.)
If we have authentication and authorization in our project, then we can use the [Authorize] attribute on the implementing class/method, just as we would on a controller/action.
We can apply arbitrary techniques to the published gRPC endpoint like any other mapped server endpoint (rate limiting, caching, …).
gRPC has support for interceptors which can be used to further improve gRPC communication
pass exceptions from server to client (basic support is built-in, but you may want to enrich it with specific handling of custom scenarios),
passing the required culture from client to server (what language the front-end is switched to),
In a more advanced variant of the layout, you can also provide automatic registration of interface and data contracts without having to decorate them with [ServiceContract], [DataContract] and [DataMember(Order = ...)] attributes. All this and much more can be found ready in:
If you (like me) were hoping to “easily” create a Blazor application that connects to a generic OIDC identity-provider using the Microsoft.AspNetCore.Components.WebAssembly.Authentication library, while also supporting connections to Azure Active Directory (AAD) this way, you’ll be disappointed.
The idea is simple, AAD does support OIDC and therefore now why shouldn’t a generic OIDC client be able to connect to AAD as well. Unfortunately the hurdles are more than you would like to overcome.
While the Microsoft.Authentication.WebAssembly.Msal library for AAD is an extension of the underlying Microsoft.AspNetCore.Components.WebAssembly.Authentication library, it does a lot more than just boilerplate configuration of the underlying generic OIDC.
The basic difference can be found, for example, in the “interop” part with the underlying oidc-client JavaScript module.
AuthenticationService.ts in Microsoft.AspNetCore.Components.WebAssembly.Authentication,
AuthenticationService.ts in Microsoft.Authentication.WebAssembly.Msal. This is manifested for example when retrieving access-tokens. The MSAL version “fixes” the AAD specificity that when querying a token endpoint does not always return an access-token with all required scopes (the details are for a broader discussion, but e.g. you don’t get a token that has User.Read scope in it along with the custom-scope of your API, etc.).
The base library uses the “caching” of tokens in the oidc-client UserManager and relies on the assumption “If token-endpoint returned an access-token, then that token has all the required scopes in it.” (i.e., it stores the required scopes for the retrieved token, and then returns the already retrieved token the next time the same scopes are requested).
The “fixed” MSAL library knows this shortcoming of the underlying oidc-client and knows that while it claims to have a token for some set of scopes, the access-token may not actually have those scopes. Therefore, it “turns off” caching at this level and always gets the token again.
After two weeks with the ThinkPad P16s and a week with the ThinkPad P1 Gen5, I got the chance to try the ThinkPad Z16 to my great joy. The Z series is brand new and the character (minimalist aluminum chassis, USB-C ports only, high-end components) is strikingly reminiscent of Apple or Dell XPS laptops.
I’ll admit that despite the excellent paper specs, I was suspicious of this newcomer, thinking that a completely fresh model lineup would need a generation or two to iron out all the newborn issues. However, much to my surprise, I have to admit that it is a very hilarious piece and I am very seriously considering getting one, even though I was already decided on the previously tested P16s.
I got the pre-production model 21D5Z9ZVUS to test:
AMD Ryzen 7 PRO 6850H processor (45W TDP)
16GB RAM
500GB SSD
no dedicated graphics card, only integrated AMD Radeon 680M
16″ WUXGA (1920×1200) touch LCD (IPS), 16:10
(135W USB-C charging, no LTE)
First impressions
At first glance, this is a different kind of ThinkPad, one that may even scare the die-hard conservative. On the other hand, I have to admit, using my own example, that if this machine hadn’t been labeled ThinkPad, I wouldn’t have had the urge to even try it and would have (wrongly) placed it somewhere in the IdeaPad category (or thereabouts, I don’t know much about it, just B-team Lenovo). The branding has undoubtedly played a role here, and it’s attracted my attention as well.
Anyway, forget the classic black ThinkPad chassis with rubberized or otherwise non-metallic surface. Here it is pure all-metal aluminum (but not shiny) in its classic light gray color. On the other hand, when opened, the surface is black and smooth (it’s quite slippery, you’ll only stumble over the black Lenovo logo under your right wrist), the edges almost sharp.
The first thing you’ll notice about this laptop is its size. The first P16s I tried seemed bigger than I would have expected, the subsequent P1 Gen5 seemed “about as I would have expected” and the Z16 is just another chunk more subtle than the P1 and in that respect “better than I would have expected”. The bezel around the 16″ display (16:10) is minimal (at the cost of a hump for the cameras and microphones), the thickness is even a little less, and the whole thing is suddenly kind of “just right – superior size”.
The choice of chassis material, 72 Wh battery capacity (versus 52.5 Wh in the P16s and 90 Wh in the P1) and touch display unfortunately predetermines the 1.9kg weight. Of course, a number somewhere around 1.5kg would be much more fitting for the machine, but compared to the 1.8kg of both the P16s and P1, it’s not that much of a difference.
The second thing you’ll notice immediately after turning it on is the noticeably inferior display. After years with high-res displays in the X1 Carbon and T14, suddenly the “ordinary” 1920×1200 “blinded” touchscreen suddenly hit me in the eyes. Fortunately, however, the Z16 comes (in addition to another non-touch 1920×1200 variant) with the ultimate OLED 3840×2400 display (with OGS touch), which neither of the P16s/P1 “competitors” offer, or the P1 does with 4K resolution in IPS. (We certainly can’t assume that the P16s/P1’s high-res displays are inferior; after all, the P-series boasts factory color calibration and are high-end displays for creative work – but OLED has its own “sound” and I assume it won’t disappoint anyone.)
The third thing that surprised me (very pleasantly this time) is thermal management. I care a lot about quiet operation and after a week with the P1 Gen5 and “charred sidewalks + deaf pedestrians”, I expected a similar experience here because of the 45W TDP. Yes, the AMD Ryzen 6850H has a paper TDP of 45W the same as the Intel i9-12900H in the P1 Gen5, and no way was I hoping that the relatively low-perforated aluminum chassis (compared to the P-models) would give room for some sophisticated cooling sound (especially if we’re only at the first generation of this series), unless it was redeemed by high temperatures and throttling performance. The opposite is true (!) – you can hardly hear the cooling during normal operation – even though the fans never turn off on AC power, the laptop just rustles lightly and doesn’t venture into any higher temperatures. When running on battery power, the fans even shut down, while under load it speeds up (still rather rarely and very refined).
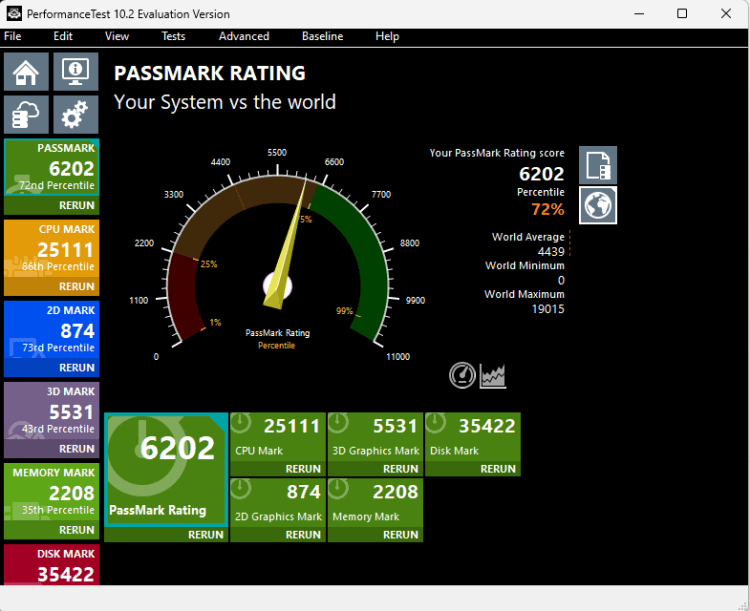
Of course, I immediately thought that this would be dearly redeemed by the reduced performance, so I reached for the Passmark benchmark to get some basic idea:
The CPU performance is nowhere near the values of the P1 Gen5 with Intel i9-12000H (there the CPU score was ~31500), but it is still a very nice result and the overall tuning of the machine is perched a bit higher than the P16s (the latter was fitted with AMD Ryzen 6850U with 28W TDP).
Overall, I was surprised by the behavior of the 6850H processor with its paper 45W TDP compared to the 6850U and its 28W TDP. Apart from TDP and frequencies, I couldn’t find any parameters in which the two processors differed, while the H-version doesn’t seem to try to “cook” the laptop any noticeably more than the U-version I had in the tested P16s. The difference in measured performance is almost negligible (CPU score 25111 vs 23603) and more likely to be a difference in the overall tuning of the notebook model lines (firmware), with the ThinkPad P16s as a workstation trying to squeeze the most out of the processor (I’d rather not even mention the P1 Gen5, that’s a completely different formula). The ThinkPad Z16, on the other hand, seems willing to “boost” (bump performance requirements), but otherwise it’s more or less the same performance level as the 6850U. So for nearly twice the price, look for other benefits here than significantly higher computing power (e.g. quieter operation, subtler chassis).
Overall impressions after a week of production use
I’d be exaggerating if I said I loved the Z16 after a week, yet I like it a lot and if Lenovo tweaked these few parameters, I’d probably “rip their hands off” (not just me) for such a machine:
black carbon instead of aluminum + “softer” design,
at least HDMI and 1x USB-A ports,
half a kilo less (with a slightly smaller battery),
ideally bring back the classic ThinkPad chicklet keyboard with higher stroke, PgUp/PgDown keys and original layout of Ctrl/Fn keys and arrow keys, but I expected more difficulties with adaptation,
(no touch or, if anything, Yoga flipping for pen usability)
Actually, these are not major drawbacks, in fact the Z16 has many positives, for me in particular:
Excellent thermal management with quiet cooling and very mild thermal symptoms,
very decent performance for development (if you don’t need graphics, it’s an ideal tune),
subtle chassis (smaller than both P16s and P1 Gen5),
large and high quality 16″ display (OLED 3840×2400) – touch with Lenovo Pen option,
USB-C docking and power supply (it complains about the 65W adapter, 90W is enough, although for fast charging the machine comes with a 135W adapter),
solid battery life (estimated at around 10-12 hours for anything but Teams-meetings),
a classic centered keyboard with no numeric part,
high quality high-end workmanship (+service+warranty),
optional LTE module (SIM),
decent equipment: fingerprint reader, IR camera for Windows Hello, SD reader.
Of course, an essential condition is also the offer of a combination of components that meets my needs. Specifically in my case, this could be for example the 21D4001LCK variant:
Final summary and comparison of P16s / P1 Gen5 / Z16
We’re moving into the 16″ ThinkPad notebook category here with a 16:10 aspect ratio display…
If you’re looking for the ultimate ultra-mobile graphics machine, are willing to sacrifice performance for everything (especially audio/thermal comfort and battery life), and have an unlimited budget, then go with the Lenovo ThinkPad P1 Gen5. Go for a variant with some dedicated graphics card to suit your needs and enjoy a formula that just about anyone else doesn’t have.
If you’re looking for a powerful machine that can also handle some of that graphics work, but you need to budget somewhere around 40,000 CZK + VAT, then go for the Lenovo ThinkPad P16s. If you prefer battery life and quieter operation, then definitely the AMD variant, absolutely ideal for developers. If, on the other hand, you need to crank up the graphics performance, then the Intel variant with a dedicated graphics card will probably do the trick (AMD versions are only made with integrated graphics).
If you are willing to pay twice as much, somewhere around 80 000 CZK + VAT, you are not concerned about workstation parameters (color calibration, ISV certification, etc.), you do not insist on port equipment, but want to indulge in a more compact design, quieter operation and maybe a little more subjective performance for development, then I recommend Lenovo ThinkPad Z16 with OLED display (or IPS without touch if you want to save).
…I’ll probably go the Z16 route at this point. Be surprised and look forward to the continuing story.
PS: I finally had the Z16 on loan for two weeks and am ordering it in the 21D4001LCK configuration. I’m keeping the P16s in my sights for other options.



 HAVIT Knowledge Base