Category Archives: Azure

Azure App Service scheduled restart

If you want to restart your App Service on a scheduled basis, you can do that using simple PowerShell:

Stop-AzureRmWebApp -Name '_App Service Name_' -ResourceGroupName '_Resource Group Name_'
Start-AzureRmWebApp -Name '_App Service Name_' -ResourceGroupName '_Resource Group Name_'

Basically you have to solve two issues:

  1. How to schedule such Powershell script to run automatically at given times? We can use a simple WebJob for that.
  2. How to authenticate the execution? We should use a Service Principal Id for that.

Let’s start from the second one.

Credits: This is an updated and fixed version of a procedure originally published by Karan Singh – a Microsoft Employee on his MSDN blog.

Getting a Service Principal Id for authentication

It is not a good idea to use a real user-account for authentication of such a job. If you have an Organizational Account with 2-Factor Authentication, forget it.

The right way of authenticating your jobs is to use a Service Principal Id which allows you to proceed with silent authentication.

To create one, save and run following Powershell script from your PC (one-off task):


param
(
    [Parameter(Mandatory=$true, HelpMessage="Enter Azure Subscription name. You need to be Subscription Admin to execute the script")]
    [string] $subscriptionName,

    [Parameter(Mandatory=$true, HelpMessage="Provide a password for SPN application that you would create")]
    [string] $password,

    [Parameter(Mandatory=$false, HelpMessage="Provide a SPN role assignment")]
    [string] $spnRole = "owner"
)

#Initialize
$ErrorActionPreference = "Stop"
$VerbosePreference = "SilentlyContinue"
$userName = $env:USERNAME
$newguid = [guid]::NewGuid()
$displayName = [String]::Format("VSO.{0}.{1}", $userName, $newguid)
$homePage = "http://" + $displayName
$identifierUri = $homePage

#Initialize subscription
$isAzureModulePresent = Get-Module -Name AzureRM* -ListAvailable
if ([String]::IsNullOrEmpty($isAzureModulePresent) -eq $true)
{
    Write-Output "Script requires AzureRM modules to be present. Obtain AzureRM from https://github.com/Azure/azure-powershell/releases. Please refer https://github.com/Microsoft/vsts-tasks/blob/master/Tasks/DeployAzureResourceGroup/README.md for recommended AzureRM versions." -Verbose
    return
}

Import-Module -Name AzureRM.Profile
Write-Output "Provide your credentials to access Azure subscription $subscriptionName" -Verbose
Login-AzureRmAccount -SubscriptionName $subscriptionName
$azureSubscription = Get-AzureRmSubscription -SubscriptionName $subscriptionName
$connectionName = $azureSubscription.SubscriptionName
$tenantId = $azureSubscription.TenantId
$id = $azureSubscription.SubscriptionId

#Create a new AD Application
Write-Output "Creating a new Application in AAD (App URI - $identifierUri)" -Verbose
$secpasswd = ConvertTo-SecureString $password -AsPlainText -Force
$azureAdApplication = New-AzureRmADApplication -DisplayName $displayName -HomePage $homePage -IdentifierUris $identifierUri -Password $secpasswd -Verbose
$appId = $azureAdApplication.ApplicationId
Write-Output "Azure AAD Application creation completed successfully (Application Id: $appId)" -Verbose

#Create new SPN
Write-Output "Creating a new SPN" -Verbose
$spn = New-AzureRmADServicePrincipal -ApplicationId $appId
$spnName = $spn.ServicePrincipalName
Write-Output "SPN creation completed successfully (SPN Name: $spnName)" -Verbose

#Assign role to SPN
Write-Output "Waiting for SPN creation to reflect in Directory before Role assignment"
Start-Sleep 20
Write-Output "Assigning role ($spnRole) to SPN App ($appId)" -Verbose
New-AzureRmRoleAssignment -RoleDefinitionName $spnRole -ServicePrincipalName $appId
Write-Output "SPN role assignment completed successfully" -Verbose

#Print the values
Write-Output "`nCopy and Paste below values for Service Connection" -Verbose
Write-Output "***************************************************************************"
Write-Output "Connection Name: $connectionName(SPN)"
Write-Output "Subscription Id: $id"
Write-Output "Subscription Name: $connectionName"
Write-Output "Service Principal Id: $appId"
Write-Output "Service Principal key: <Password that you typed in>"
Write-Output "Tenant Id: $tenantId"
Write-Output "***************************************************************************"

You will be asked for a Subscription Name and Password for the Service Principal Id. You will also need to be an admin on your Azure Active Directory to be able to proceed.

Save the results securely, you can use the created Service Principal Id which gets the Owner role (or any other you specify) for many other administrative tasks (although it is a good idea to create a separate Service Principal for every single task).

2018-07-31_17-32-06.png

Scheduling the restart using PowerShell WebJob

Use any WebJob deployment procedure of your taste to create a scheduled Powershell WebJob executing following script:

$ProgressPreference= "SilentlyContinue"
$password = '_Service Principal Key/Password_'
$secpasswd = ConvertTo-SecureString $password -AsPlainText -Force
$mycreds = New-Object System.Management.Automation.PSCredential ("_Service Principal Id_", $secpasswd)
Add-AzureRmAccount -ServicePrincipal -Tenant '_Tenant Id_' -Credential $mycreds
Select-AzureRmSubscription -SubscriptionId '_Subscription Id_'
Stop-AzureRmWebApp -Name '_App Service Name_' -ResourceGroupName '_Resource Group Name_'
Start-AzureRmWebApp -Name '_App Service Name_' -ResourceGroupName '_Resource Group Name_'

For manual deployment, you can use the Azure Portal directly:


  1. Save the script as run.ps1 file and create a ZIP archive with it (with any name).
  2. Go to App Service / Web Jobs and Add a new WebJob there:

2018-07-31_17-47-28.png

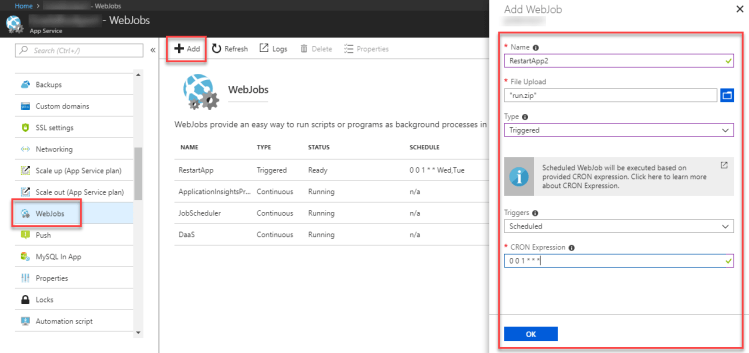
And it’s done. Just be sure to enable Always On for your App Service to execute the WebJobs on schedule.

You can Start the job manually from here (the Start button) if  you want to test it and you can verify the execution results using KUDU Dashboard (the Logs button).


Managing your Microsoft Account-owned Azure Subscription with your Organizational Account (AAD)

There might be a situation where

  • you have an existing Azure Subscription associated with your Microsoft Account,
  • you want to manage the subscription using your Organizational Account(s) (Azure AD),
  • you don’t want to or cannot transfer the ownership of the subscription to the Organizational Account – e.g. it is a sponsored subscription where the sponsorship is related to a specific Microsoft Account (Microsoft Partner Network, MSDN Subscription, MVP Sponsorship, etc.).

The trick here is to change the directory of the subscription to your Azure AD directory. Changing the subscription directory is a service-level operation. It doesn’t affect your subscription billing ownership, and the Account Admin still remains the original Microsoft Account.

There are only a few simple steps to follow:

1. Invite the Microsoft Account to your Azure AD as a guest user

To be able to change the directory, your Microsoft Account owning the subscription must exist in the target Azure AD. To associate the MSA with the AAD:

  • Login to Azure Portal as the Azure AD administrator of the target AAD.
  • Open the Azure Active Directory blade.
  • Go to the Users section.
  • Click the + New guest user button at the top of the blade.
  • Invite your Microsoft Account to the Azure Active Directory.

2018-03-26_9-50-53

2. Accept the invitation of your Microsoft Account to AAD

Now you have to accept the invitation…

  • You will receive an invitation e-mail to the mailbox associated with your Microsoft Account.
  • Do not click the Accept Invitation button from your e-mail client as it usually opens the web page in your browser where you are logged in using your Organizational Account and the invitation acceptance will fail.
  • Instead, copy the target URL of the button and open it in a New incognito window  (or In-private window or whatever it is called in your browser). (Alternatively you can sign out from your Organizational Account.)
  • Login using your Microsoft Account when asked for the credentials.
  • After accepting the invitation you will probably end up at the Applications page of the AAD (often empty), which might be a little confusing, but the association is done. You can close this browser window.

3. Change the directory of the subscription

Now you can change the directory of the subscription:

  • Sign in to Azure Portal using your Microsoft Account.
  • Navigate to your subscription and open the Subscriptions blade (you can type “subscription” in the search box).
  • Click the Change directory button in the top-row of the blade.
  • In the Change the directory panel you should have an option to select your Azure AD as a target directory for your subscription.
  • Confirm the change (Change button below).

Now you have to wait up to 10 minutes for the change to take effect.

2018-03-26_9-49-25

4. Add permissions to your Organizational Account

To be able to manage the subscription by your Organizational Account, you have to add permissions to it (still signed in with the original Microsoft Account).

  • In the Subscription blade switch to the Access control (AIM) section.
  • Add your Organizational Account with an Owner role to the subscription level.
  • Right-click the Organizational Account added and click Add as co-administrator in the context menu. (An optional step for legacy scenarios where the co-administrator privilege is still needed).

2018-03-26_9-22-25

5. Done

  • Sign-out from your Microsoft Account and sign up using your Organizational Account to verify you are able to manage your subscription from there.

Cloud Application Development – 04 Azure Storage, Blobs, Queues [MFF UK NSWI152, LS 2018]

Recording from the fourth lesson (13/Mar 2018) of Cloud Applications Development course (NSWI152) for MMF UK (LS 2017/2018). It is published on our HAVIT YouTube Channel.

Topics covered:

  • Azure Storage Account
  • Azure Storage – Blobs
  • Azure Storage – Queues

You can find the labs instructions on GitHub (LAB4 + LAB5).

How to change the password for your SendGrid account created from Azure

Short Story

Currently the only way is to use the forgot password feature on the SendGrid login page. The reset-password link is delivered to the mailbox associated with your SendGrid account (be sure to set this e-mail in advance).

Long Story

SendGrid is currently one of the few possibilities you have in Azure to send e-mails from your application. If you create your SendGrid account from Azure you can start with a free plan with 25 000 free e-mails per month.

For SendGrid accounts created in Azure there used to be an option for Changing/Resetting your password:

…which is unfortunately not available any more.

Azure Support’s reply to my question:

Passwords and other secrets associated with Windows Azure Store are managed exclusively by the provider (like Sendgrid). Please request the reset/change of the password directly with SendGrid. Support contact information is almost always found on the provider’s web site main page.

Unfortunately, if you log-in to your SendGrid account created from Azure, the option to “edit” username/password is disabled (they do not have a separate UI for changing the password and they don’t want to allow you to change the username which associates the account with Azure):

2018-03-05_11-10-15

Currently the only way to change your password for your SendGrid account created from Azure is to use the “forgot password” feature from SendGrid login page:

2018-03-05_11-23-13

Please note that you’ll need to enter the account username (not email address) for this form to work.

The reset-password link is delivered to the mailbox associated with your SendGrid account (be sure to set this e-mail in advance in Account Details).

Cloud Application Development – 02 Azure App Services, WebJobs, SQL, SendGrid [MFF UK NSWI152, LS 2018]

Recording from the second lesson (27/Feb 2018) of Cloud Applications Development course (NSWI152) for MMF UK (LS 2017/2018). It is publish on our HAVIT YouTube Channel.

Topics covered:

  • Azure App Service
    • Creating simple Web Site
    • Deployment from Visual Studio
    • Deployment from GitHub
  • Web Jobs – Creating & Deployment
  • Azure SQL database – Creating & Accessing from Visual Studio 2017
  • Azure SendGrid mail service

You can find the labs instructions on GitHub (LAB1 + LAB2).

Azure SQL: The database ‘tempdb’ has reached its size quota. Partition or delete data, drop indexes, or consult the documentation for possible resolutions. (Microsoft SQL Server, Error: 40544)

On one of the projects I’m involved in, whatever we wanted to do with our Azure SQL DB (V12), we got this error:

The database ‘tempdb’ has reached its size quota. Partition or delete data, drop indexes, or consult the documentation for possible resolutions. (Microsoft SQL Server, Error: 40544)

As there is not much to do in such situation we asked Microsoft Azure Support for assistance and this is their reply (saved here for further reference):

If you experience the TempDB full issue again, then please leverage the DMVs below and look for active transactions which are taking maximum TempDB space. For a long term fix, I would recommend tuning those queries to use less temp space and if the issue is being caused by multiple queries running concurrently then serialize the workload to not consume all available TempDB space. Here are the queries that will give you insight into which queries are causing this:

Query to get Used and Free Space in TempDB
Note: This can be misleading as it doesn’t include free space up to max size

SELECT
SUM(allocated_extent_page_count) AS [used pages],
(SUM(allocated_extent_page_count)*1.0/128) AS [used space in MB],
SUM(unallocated_extent_page_count) AS [free pages],
(SUM(unallocated_extent_page_count)*1.0/128) AS [free space in MB]
FROM tempdb.sys.dm_db_file_space_usage;

Retrieving information about which clients (connected to current database) are using TempDB with open transactions

SELECT top 5 a.session_id, a.transaction_id, a.transaction_sequence_num, a.elapsed_time_seconds,
b.program_name, b.open_tran, b.status
FROM tempdb.sys.dm_tran_active_snapshot_database_transactions a
join sys.sysprocesses b
on a.session_id = b.spid
ORDER BY elapsed_time_seconds DESC

Retrieving information about which active tasks (in current database) are using TempDB

SELECT es.host_name , es.login_name , es.program_name,
st.dbid as QueryExecContextDBID, DB_NAME(st.dbid) as QueryExecContextDBNAME, st.objectid as ModuleObjectId,
SUBSTRING(st.text, er.statement_start_offset/2 + 1,(CASE WHEN er.statement_end_offset = -1 THEN LEN(CONVERT(nvarchar(max),st.text)) * 2 ELSE er.statement_end_offset
END - er.statement_start_offset)/2) as Query_Text,
tsu.session_id ,tsu.request_id, tsu.exec_context_id,
(tsu.user_objects_alloc_page_count - tsu.user_objects_dealloc_page_count) as OutStanding_user_objects_page_counts,
(tsu.internal_objects_alloc_page_count - tsu.internal_objects_dealloc_page_count) as OutStanding_internal_objects_page_counts,
er.start_time, er.command, er.open_transaction_count, er.percent_complete, er.estimated_completion_time, er.cpu_time, er.total_elapsed_time, er.reads,er.writes,
er.logical_reads, er.granted_query_memory
FROM tempdb.sys.dm_db_task_space_usage tsu
inner join sys.dm_exec_requests er ON ( tsu.session_id = er.session_id and tsu.request_id = er.request_id)
inner join sys.dm_exec_sessions es ON ( tsu.session_id = es.session_id )
CROSS APPLY sys.dm_exec_sql_text(er.sql_handle) st
WHERE (tsu.internal_objects_alloc_page_count+tsu.user_objects_alloc_page_count) > 0
ORDER BY (tsu.user_objects_alloc_page_count - tsu.user_objects_dealloc_page_count)+(tsu.internal_objects_alloc_page_count - tsu.internal_objects_dealloc_page_count) DESC

Find tempDB data size

SELECT SUBSTRING(st.text, er.statement_start_offset/2 + 1,
(CASE WHEN er.statement_end_offset = -1
THEN LEN(CONVERT(nvarchar(max),st.text)) * 2
ELSE er.statement_end_offset END - er.statement_start_offset)/2) as Query_Text,tsu.session_id ,tsu.request_id,
tsu.exec_context_id,
(tsu.user_objects_alloc_page_count - tsu.user_objects_dealloc_page_count) as OutStanding_user_objects_page_counts,
(tsu.internal_objects_alloc_page_count - tsu.internal_objects_dealloc_page_count) as OutStanding_internal_objects_page_counts,
er.start_time, er.command, er.open_transaction_count, er.percent_complete, er.estimated_completion_time,
er.cpu_time, er.total_elapsed_time, er.reads,er.writes,
er.logical_reads, er.granted_query_memory,es.host_name , es.login_name , es.program_name
FROM sys.dm_db_task_space_usage tsu INNER JOIN sys.dm_exec_requests er
ON ( tsu.session_id = er.session_id AND tsu.request_id = er.request_id) INNER JOIN sys.dm_exec_sessions es
ON ( tsu.session_id = es.session_id ) CROSS APPLY sys.dm_exec_sql_text(er.sql_handle) st
WHERE (tsu.internal_objects_alloc_page_count+tsu.user_objects_alloc_page_count) > 0
ORDER BY (tsu.user_objects_alloc_page_count - tsu.user_objects_dealloc_page_count)+ (tsu.internal_objects_alloc_page_count - tsu.internal_objects_dealloc_page_count) DESC

Checking if tempDB has an active transaction

Examine log_reuse_wait_desc from sys.databases if you see ACTIVE_TRANSACTION this could mean there is a long running active transaction in tempdb that is blocking log flush =>

Check for active transaction on tempDB

select log_reuse_wait_desc, * from sys.databases where name = 'tempdb'

select d.name, d.log_reuse_wait_desc, t.* from sys.dm_tran_locks t inner join sys.databases d on t.resource_database_id = d.database_id

Few more docs about optimizing temp DB –
https://docs.microsoft.com/en-us/sql/relational-databases/databases/tempdb-database
https://technet.microsoft.com/en-us/library/ms175527(v=sql.105).aspx
https://technet.microsoft.com/en-us/library/ms190768(v=sql.105).aspx

Additionally, the higher the pricing tier, your database would have more tempdb space as well.

Azure: How to solve Azure SQL “database is not currently available”

Developers sometimes ask me about “database is not currently available” error when using Azure SQL and Entity Framework 6. In this article I explain why happens this error and how to solve it easily.

Case Study

Let’s start with the real life example from our customer:

„… we detected an error in our logs: „Database ‘XXX’ on server ‘XXX’ is not currently available.”. It happens usually once a week and sometimes it happens more times during a night. Should we worry about it? We want to move the database from US region do EU and move all databases under elastic pool, so that maybe we do not have to solve this issue now…“

Theory about Azure SQL

Azure SQL service is a typical PaaS service so that developer doesn’t have to worry about the platform. OS updates, security updates and other things are automatically solved on the provider side. The problem is that sometimes SQL Server reconfiguration is needed and in this case short downtime occurs. It happens during updating OS or when an issue occurred (process or load balancing failure). Most of the downtimes are very short (threshold about 60 seconds). Most of the developers do not know about this issue and just a few developers experienced this error but they do not solve it because the error is exceptional.

Solution

If you want to solve this issue, you must implement retry logic. If you use Entity Framework 6 or EF Core, the solution is very easy. Developers in Microsoft know about this behavior and they prepared easy solution in ORMs.

Connection Resiliency / Retry Logic (EF 6)

In case of EF 6 you must allow Execution Strategy and choose SqlAzureExecutionStrategy. Complete configuration looks like this:

public class MyConfiguration : DbConfiguration 
{ 
    public MyConfiguration() 
    { 
        SetExecutionStrategy( 
            "System.Data.SqlClient", 
            () => new SqlAzureExecutionStrategy(1, TimeSpan.FromSeconds(30))); 
    } 
}

Source and another information you can find in article:

Connection Resiliency (EF Core)

If you work with EF Core, you can analogicaly configure your project in the place where you register all services.

// Startup.cs from any ASP.NET Core Web API
public class Startup
{
    // Other code ...
    public IServiceProvider ConfigureServices(IServiceCollection services)
    {
        // ...
        services.AddDbContext(options =>
        {
            options.UseSqlServer(Configuration["ConnectionString"],
            sqlServerOptionsAction: sqlOptions =>
            {
                sqlOptions.EnableRetryOnFailure(
                maxRetryCount: 5,
                maxRetryDelay: TimeSpan.FromSeconds(30),
                errorNumbersToAdd: null);
            });
        });
    }
//...
}

Source and another information you can find in article:

As you can see in examples, implementation is a piece of cake.

Azure: Disable outbound traffic from VNet to internet except the Azure Services

Virtual Networks and Virtual Network Interfaces in Azure could have own Network Security Groups. Every group consists from security rules which enable or disable traffic by defined rules. In some cases we want to disable outbound traffic to the internet but unfortunately this means we disable traffic to various Azure services which are out of our virtual network. In this article I’ll explain how to solve this issue in a few steps.

Meet the NSG and NSG Rules

NSG (Network Security Group) is a security rule set. Every isolated security rule enable or disable traffic based on the configuration. Configuration consists from IP address and protocol or kind of service (Virtual Network, Internet, Load Balancer). There are some examples on the image below:

ukazka-nsg-rules

All the rules are applicated by their priority (higher numbers are applied first). Your own security rules you can define with priority 0-4096. At the end of the rules set we can see Default Rules which are defined everytime and they have significantly lower priority (priority 60000 and higher).

ukazka-vlastniho-pravidla

This Default Rules cannot be deleted neither changed but logically they can be overrided by another rules with higher priority. See the example below. Default rule with low priority is overriden by custom rule. This is good example how to disable all the outbound traffic to the internet.

zakazani-konektivity-outbound-inet

The rule set (NSG) is applicable to Virtual Networks or Virtual Network Interfaces (NIC). In the real world we apply the rule set for the whole Virtual Network together with specific rules for Virtual Machines (each Virtual Machine can only have one NIC).

How to disable outbound traffic and solve troubles with Azure services availability

Ideally we could create Virtual Network and disable all the outbound trafic to the internet. The problem is that most of the Azure services could not be assigned to our Virtual Network (they are available on the internet) so that we cannot disable all the trafic. Fortunately we can apply a few rules:

  1. By default all the outbound traffic is allowed (we cannot delete this rule)
  2. We‘ll add new rule and disable all the outbound traffic (this is way how to override rule no 1)
  3. We’ll add new rule set and allow outbound traffic to IP addresses of Azure Services (we partially override rule no 2)

It seems to be easy but the problem is we never know which IP addresses will have Azure Services assigned. We usually do not care about it because we typically use just DNS. The best solution is to allow outbound traffic to all the IP addresses of all the Azure Services. List of all IP ranges we can download as XML:

seznam-ip-adres-datovych-center-a-sluzeb-v-azure

Restriction for NSG (max 200 security rules)

There is another issue we have to solve. NSG has restriction for maximum of 200 security rules and the West Europe region use over 400 IP ranges. It means we must contact Microsoft Azure Support and request for increasing limit. Finally, Microsoft allows us to manage 500 security rules. More about Azure limits you can read on:

Design: Automation with Azure PowerShell and VSTS Release Management

How to add over the 400 security rules? By hand? Nooo.. IP Ranges could change and we need to automate. And right now we need Azure Powershell. With accomplishing this challenge helped me article from Keyth Mayer:

His solution is interactive script and a wizard which creates rule set based on user input. In my case I needed change the behavior and support simple requirement: to be able to run script recurently with well known configuration using the VSTS Release Management. As the trigger I decided to use simple timer scheduler.

Solution: Automatic continuous update of NSG rules

From the high-level perspective the solution is easy:

  1. Write a PowerShell script
  2. Create VSTS Release Definition which consists from one step: run the script from step 1

1. PowerShell script

How the algorithm works? First I delete all the rules created previously by automation, then I download new XML file with IP address ranges and finaly I add all the IP address ranges as a set of new rules. It means that NSG is never changed (just the rules inside). Update of the NSG is fired in the end of the script so that I do not have to be afraid of issues and unsuccessful partial update. The final script follows here:

$subscriptionId = 'xxx'
$nsgName = 'xxx'
$rgName = 'xxx'
 
Select-AzureRmSubscription -SubscriptionId $subscriptionId
$nsg = Get-AzureRmNetworkSecurityGroup -Name $nsgName -ResourceGroupName $rgName
 
# Download current list of Azure Public IP ranges
$downloadUri = "https://www.microsoft.com/en-in/download/confirmation.aspx?id=41653"
$downloadPage = Invoke-WebRequest -Uri $downloadUri -UseBasicParsing
$xmlFileUri = ($downloadPage.RawContent.Split('"') -like "https://*PublicIps*")[0]
 
$response = Invoke-WebRequest -Uri $xmlFileUri -UseBasicParsing
 
# Get list of regions & public IP ranges
[xml]$xmlResponse = [System.Text.Encoding]::UTF8.GetString($response.Content)
 
$regions = $xmlResponse.AzurePublicIpAddresses.Region
 
#$selectedRegions = $regions.Name | Out-GridView -Title "Select Azure Datacenter Regions ..." -PassThru
$ipRange = ( $regions | where-object Name -In "europewest" ).IpRange
 
$rulePriority = 300
$counter = 1
 
ForEach ($rule in $nsg.SecurityRules | where-object Direction -Eq 'Outbound') {
    If($rule.Name -like '*AllowAzureOutbound_*'){
        Remove-AzureRmNetworkSecurityRuleConfig -Name $rule.Name -NetworkSecurityGroup $nsg
 
        Write-Host("REMOVED NSG RULE " + $rule.Name)
    }
}
 
ForEach ($subnet in $ipRange.Subnet) {
 
    $rulePriority++
    $counter++
 
    $ruleName = "AllowAzureOutbound_" + $subnet.Replace("/","-")
 
    $nsgRule = New-AzureRmNetworkSecurityRuleConfig `
            -Name $ruleName `
            -Description "Allow outbound to Azure $subnet" `
            -Access Allow `
            -Protocol * `
            -Direction Outbound `
            -Priority $rulePriority `
            -SourceAddressPrefix VirtualNetwork `
            -SourcePortRange * `
            -DestinationAddressPrefix "$subnet" `
            -DestinationPortRange *
 
    $nsg.SecurityRules += ,$nsgRule
 
    Write-Host("ADDED NSG RULE " + $subnet)
 
    If ($counter -gt 490)
    {
        break
    }
}
 
If (!$error) {
    Set-AzureRmNetworkSecurityGroup -NetworkSecurityGroup $nsg
} else {
    Write-Host("NOTHING CHANGED BECAUSE OF ERROR")
}

I am not a PowerShell guru and probably the script could be written more elegantly and efficiently.

2. VSTS Release Definition

My Release Definition consists from one environment with one single step (Azure PowerShell task). This task connects to Azure Subscription and runs the script from step 1.

release-definition-s-taskem-azure-ps

It looks nice but there is a small catch. Current version of Azure PowerShell allows to create inline script with max length 500 chars. We have to hack a bit: open developer console in favorite browser and break the client validation.

AppService: Setting a time-zone with a WEBSITE_TIME_ZONE App Setting (and many more)

By default, your AppServices run in UTC. There is an almost undocumented (or at least very little known) feature of KUDU which allows you forcing a specific time zone to your application. By adding specific Application Settings to your App Service (in Azure Portal) you can set following features:

  • WEBSITE_TIME_ZONE, e.g. Central Europe Standard Time (List of supported values)
  • SCM_TOUCH_WEBCONFIG_AFTER_DEPLOYMENT = 1/0 – does what it says (default is 1)
  • SCM_TRACE_LEVEL = 1..4 – you can get more detailed tracing by setting higher level (default is 1)
  • Build/GIT related options
  • Caching related options
  • Setting Node/NPN version
  • WEBSITE_LOAD_CERTIFICATES – Loading certificates
  • Low-level diagnostic switches
  • WEBSITE_DISABLE_SCM_SEPARATION – allows you to run your site and SCM (Kudu) in the same sandbox (and potentially save some resources) – unfortunately marked as legacy-obsolete and not supported any more
  • and many more

You can find complete list of features in Project KUDU Wiki.
 

Azure: Checking if a blob exists using its URI

Having only a storage account (CloudBlobClient) and a blob URI makes it a little bit tricky to check if the blob actually exists. To be able to use the ​​ICloudBlob.Exists()​ method, you have to have a blob-reference and there is no easy way to get it from URI.

If you just need to know if the blob exists, you can make a simple HTTP HEAD request to the URI with any HTTP client.

If you need the blob-reference for further use, there is a CloudBlobClient.GetBlobReferenceFromServer(Uri blobUri) method. As you call it, it hits the server with a HEAD request and throws an exception if the blob does not exist (so there is no chance to use the Exists method later).

You can catch this exception with a nice pattern-matching:

ICloudBlob blob;
try
{
    blob = blobClient.GetBlobReferenceFromServer(new Uri(url));
}
catch (Microsoft.WindowsAzure.Storage.StorageException ex)
            when ((ex.InnerException is System.Net.WebException wex)
                    && (wex.Response is System.Net.HttpWebResponse httpWebResponse)
                    && (httpWebResponse.StatusCode == System.Net.HttpStatusCode.NotFound))
{
    // blob does not exist, do whatever you need here
    return null;
}
// further code able to use the blob-reference