Can you imagine a situation when this code compiles and runs?
public void Reset()
{
    this = new Foo();
}
See the result: https://dotnetfiddle.net/JheuMu.
Can you imagine a situation when this code compiles and runs?
public void Reset()
{
this = new Foo();
}
See the result: https://dotnetfiddle.net/JheuMu.
Recording from HAVIT Educational window from 20th June 2019.
Recording from HAVIT Educational windows from 16th May 2019. Lukáš Rada presented an introduction to TypeScript.
Recording from HAVIT Educational windows from 28th March 2019. Jiří Činčura presented the ref returns in C#.

My first impressions of 6th gen in comparison to 4th gen:
Well, the last two items seems to be interconnected. The X1 6gen comes with so called “Standby (S0 Low Power Idle) Network Connected” power profile which keeps the notebook half-alive (able to download updates etc.). After switching the Sleep mode to S3 (switch sleep mode from “Windows 10” to “Linux” in BIOS) it is cold during Sleep. The wake-up is a little bit slower in S3 than in S0, but still pretty fast.
Simple query can help you get basic insights on when the index statistics where updated:
SELECT
		o.name AS TableName,
		i.name AS IndexName,
		STATS_DATE(i.object_id, i.index_id) AS StatisticsUpdate
	FROM sys.objects o
		INNER JOIN sys.indexes i ON (o.object_id = i.object_id)
	WHERE
		(i.type > 0)
		AND (o.type_desc NOT IN ('INTERNAL_TABLE', 'SYSTEM_TABLE'))
	ORDER BY TableName, IndexName
	-- ORDER BY StatisticsUpdate
See also:
For me it was quite confusing to find the 2017 version of LocalDB and it is not a streamline process to upgrade your local default instance. The link for “SQL Server 2017 Express LocalDB” on official website (https://www.microsoft.com/en-us/sql-server/sql-server-editions-express) leads to “SQLServer2016-SSEI-Expr.exe” which runs a SQL Server 2016 with SP2 installer. Now what?
The easiest way to upgrade your LocalDB instance to 2017 is:
sqllocaldb stop MSSQLLocalDB
sqllocaldb delete MSSQLLocalDB
sqllocaldb stop MSSQLLocalDB
sqllocaldb delete MSSQLLocalDB
sqllocaldb create MSSQLLocalDB
Credits:
Word has a non-breaking hyphen (Ctrl+Shift+-). If you use it in a word, it does not break the line (in opposite to the regular hyphen).
If you want to mass-replace your regular hyphens in whole document (in my case, I wanted to print a morse-code quiz :-D) you can use the Replace (Ctrl+H) dialog.
Unfortunately the Replace dialog does not accept the Ctrl+Shift+- keyboard shortcut. You have to type ^~ to represent the non-breaking hyphen:
If you want to restart your App Service on a scheduled basis, you can do that using simple PowerShell:
Stop-AzureRmWebApp -Name '_App Service Name_' -ResourceGroupName '_Resource Group Name_'
Start-AzureRmWebApp -Name '_App Service Name_' -ResourceGroupName '_Resource Group Name_'
Basically you have to solve two issues:
Let’s start from the second one.
Credits: This is an updated and fixed version of a procedure originally published by Karan Singh – a Microsoft Employee on his MSDN blog.
It is not a good idea to use a real user-account for authentication of such a job. If you have an Organizational Account with 2-Factor Authentication, forget it.
The right way of authenticating your jobs is to use a Service Principal Id which allows you to proceed with silent authentication.
To create one, save and run following Powershell script from your PC (one-off task):
param
(
    [Parameter(Mandatory=$true, HelpMessage="Enter Azure Subscription name. You need to be Subscription Admin to execute the script")]
    [string] $subscriptionName,

    [Parameter(Mandatory=$true, HelpMessage="Provide a password for SPN application that you would create")]
    [string] $password,

    [Parameter(Mandatory=$false, HelpMessage="Provide a SPN role assignment")]
    [string] $spnRole = "owner"
)

#Initialize
$ErrorActionPreference = "Stop"
$VerbosePreference = "SilentlyContinue"
$userName = $env:USERNAME
$newguid = [guid]::NewGuid()
$displayName = [String]::Format("VSO.{0}.{1}", $userName, $newguid)
$homePage = "http://" + $displayName
$identifierUri = $homePage

#Initialize subscription
$isAzureModulePresent = Get-Module -Name AzureRM* -ListAvailable
if ([String]::IsNullOrEmpty($isAzureModulePresent) -eq $true)
{
    Write-Output "Script requires AzureRM modules to be present. Obtain AzureRM from https://github.com/Azure/azure-powershell/releases. Please refer https://github.com/Microsoft/vsts-tasks/blob/master/Tasks/DeployAzureResourceGroup/README.md for recommended AzureRM versions." -Verbose
    return
}

Import-Module -Name AzureRM.Profile
Write-Output "Provide your credentials to access Azure subscription $subscriptionName" -Verbose
Login-AzureRmAccount -SubscriptionName $subscriptionName
$azureSubscription = Get-AzureRmSubscription -SubscriptionName $subscriptionName
$connectionName = $azureSubscription.SubscriptionName
$tenantId = $azureSubscription.TenantId
$id = $azureSubscription.SubscriptionId

#Create a new AD Application
Write-Output "Creating a new Application in AAD (App URI - $identifierUri)" -Verbose
$secpasswd = ConvertTo-SecureString $password -AsPlainText -Force
$azureAdApplication = New-AzureRmADApplication -DisplayName $displayName -HomePage $homePage -IdentifierUris $identifierUri -Password $secpasswd -Verbose
$appId = $azureAdApplication.ApplicationId
Write-Output "Azure AAD Application creation completed successfully (Application Id: $appId)" -Verbose

#Create new SPN
Write-Output "Creating a new SPN" -Verbose
$spn = New-AzureRmADServicePrincipal -ApplicationId $appId
$spnName = $spn.ServicePrincipalName
Write-Output "SPN creation completed successfully (SPN Name: $spnName)" -Verbose

#Assign role to SPN
Write-Output "Waiting for SPN creation to reflect in Directory before Role assignment"
Start-Sleep 20
Write-Output "Assigning role ($spnRole) to SPN App ($appId)" -Verbose
New-AzureRmRoleAssignment -RoleDefinitionName $spnRole -ServicePrincipalName $appId
Write-Output "SPN role assignment completed successfully" -Verbose

#Print the values
Write-Output "`nCopy and Paste below values for Service Connection" -Verbose
Write-Output "***************************************************************************"
Write-Output "Connection Name: $connectionName(SPN)"
Write-Output "Subscription Id: $id"
Write-Output "Subscription Name: $connectionName"
Write-Output "Service Principal Id: $appId"
Write-Output "Service Principal key: <Password that you typed in>"
Write-Output "Tenant Id: $tenantId"
Write-Output "***************************************************************************"
You will be asked for a Subscription Name and Password for the Service Principal Id. You will also need to be an admin on your Azure Active Directory to be able to proceed.
Save the results securely, you can use the created Service Principal Id which gets the Owner role (or any other you specify) for many other administrative tasks (although it is a good idea to create a separate Service Principal for every single task).

Use any WebJob deployment procedure of your taste to create a scheduled Powershell WebJob executing following script:
$ProgressPreference= "SilentlyContinue"
$password = '_Service Principal Key/Password_'
$secpasswd = ConvertTo-SecureString $password -AsPlainText -Force
$mycreds = New-Object System.Management.Automation.PSCredential ("_Service Principal Id_", $secpasswd)
Add-AzureRmAccount -ServicePrincipal -Tenant '_Tenant Id_' -Credential $mycreds
Select-AzureRmSubscription -SubscriptionId '_Subscription Id_'
Stop-AzureRmWebApp -Name '_App Service Name_' -ResourceGroupName '_Resource Group Name_'
Start-AzureRmWebApp -Name '_App Service Name_' -ResourceGroupName '_Resource Group Name_'
For manual deployment, you can use the Azure Portal directly:
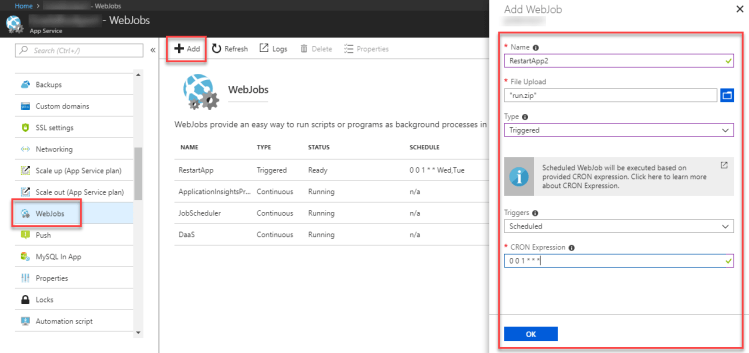
And it’s done. Just be sure to enable Always On for your App Service to execute the WebJobs on schedule.
You can Start the job manually from here (the Start button) if you want to test it and you can verify the execution results using KUDU Dashboard (the Logs button).
We have a mail-enabled public folder called Accounting which has an auto-generated e-mail address Accounting@havit.onmicrosoft.com. We use this folder to archive all the accounting-related communication (e.g. by Bcc/Cc-ing all e-mails to Accounting@havit.onmicrosoft.com).
A few days ago we started using Microsoft Teams where we created a new team called Accounting.
Now whenever we try to send anything to Accounting@havit.onmicrosoft.com we get an error:
Remote Server returned ‘532 5.3.2 STOREDRV.Deliver; Missing or bad mailbox Database property’
We renamed the Microsoft Teams team to Accounting, Administration (anything else than Accounting) and the issued disappeared immediately.
…there has to be some weird bug in Office365/Exchange which breaks the message routing when there is a team and public folder name collision.
UPDATE: After few days, the issue reappeared for some scenarios. We had to adjust e-mail addresses of the public-folder and the team manually to fit our needs.
